Effortless Next.js App Authentication using Clerk Auth
Streamlining User Login and Administration in Next.js Apps
What is Clerk Auth?
Clerk Auth is a modern authentication and user management platform that aims to simplify the process of adding authentication and security features to web applications.
It provides developers with a set of tools and APIs to handle user registration, login, and account management, allowing them to focus on building their application's core functionality without getting bogged down by the complexities of user authentication.
Advantages of Clerk Auth
Easy Integration
Seamless integration with popular web frameworks like Next.js, Remix, and Gatsby.Customizable UI Components
Pre-built, easily customizable UI components to save development time.Robust Security
Features like secure password hashing, CSRF protection, and multi-factor authentication.Scalability
Designed to handle user authentication at scale, supporting millions of users.Single Sign-On (SSO) Support
Seamless SSO for multiple applications, allowing users to authenticate once.
Disadvantages of Clerk Auth
Limited Customization:
Clerk Auth provides customizable UI components but has limited flexibility in modifying authentication flows and user interfaces, which can be challenging for unique designs or specific needs.
Dependency on Third-Party Service:
Using Clerk Auth saves development time but makes you reliant on their availability and performance. Downtime or performance issues could impact your application's authentication functionality.
Setting Up Clerk Auth in a Next.js Project
Clerk Auth provides a seamless integration with Next.js, a popular React-based framework for building web applications. In this section, we will walk through the steps to set up Clerk Auth in a Next.js project.
To set up Clerk Auth in a Next.js project, follow these steps:
Create a new Next.js project using
create-next-app.Install the Clerk Auth SDK using
npm install @clerk/nextjs.Visit the Clerk Auth website and sign up for an account. You will get an API key and other credentials required for integration.
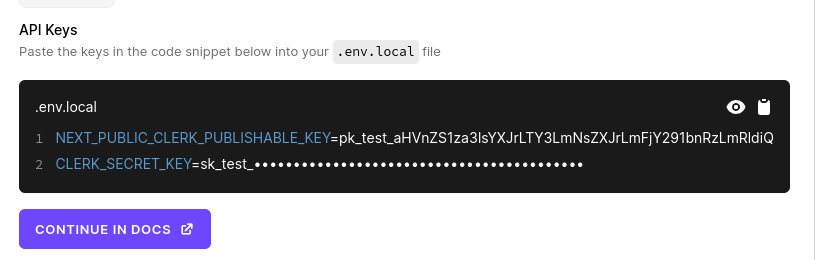
Create a
.envfile and add your Clerk API keys:NEXT_PUBLIC_CLERK_PUBLISHABLE_KEY=•••••••••••••••••••••••• CLERK_API_KEY=••••••••••••••••••••••••••••••••••••••••••Import the
ClerkProviderin_app.jsxand wrap your app:import { ClerkProvider } from '@clerk/nextjs'; function MyApp({ Component, pageProps }) { return ( <ClerkProvider> <Component {...pageProps} /> </ClerkProvider> ); }Protect routes by wrapping components in
SignedInandSignedOut:<SignedIn> {/* Show protected component */} </SignedIn> <SignedOut> {/* Redirect to sign in */} </SignedOut>Use the
getAuth()function to authenticate API routes:import { getAuth } from '@clerk/nextjs/server'; const { userId } = getAuth(req); if (!userId) { res.status(401).json({ status: 'Unauthorized' }); }Start the development server with
npm run dev.
With these steps, you have successfully set up Clerk Auth in your Next.js project. You can now leverage Clerk Auth's authentication and user management features within your Next.js application.
To implement specific authentication flows and UI components provided by Clerk Auth, refer to the Clerk Auth documentation for detailed instructions.
Resources
I've gathered some awesome resources to assist you in getting started with Clerk Auth in your Next.js project. Enjoy exploring and have fun!
Conclusion
Clerk Auth can be a powerful addition to your web development toolkit, providing a streamlined approach to user authentication and management. By leveraging Clerk Auth's features and following the integration steps, you can enhance the security and user experience of your web application while saving development time.
Now, I'd love to hear your thoughts and gather any questions or topics you'd like me to address in future articles related to anything React and Web Development. Your input will help me provide more valuable insights and cater to your specific interests.
Also, I tweet my blogs on Twitter. Make sure to follow me to get the latest updates regarding everything Web Development!